Quite a few members have asked for a newspost with up-to-date information about the assembly, speed improvements as well as estimations how things will continue.
This will probably be a longer post, so grab some tea or coffee and enjoy the read.
Why has assembly been so slow until now?
There various reasons why assembly has been so slow.
Too much work and too little time
One of them was that I had very little time: Due to Covid-19, my main employee who handles all the shipments in the shop was not in the office for more than two months. During that time, I had to handle all shipments myself - and so time was very limited.
During the little time I had left, I preassembled units and had to figure out what issues there are and how to prevent / improve them.
More on that later
That reason has been resolved now, luckily. My employee is back shipping, I was able to catch up with all tickets in the shop and my wife (who recently lost her job) is now preassembling units, which makes assembly a lot faster than before.
Last week I assembled 12 units within 2 hours each day, which is why we suddenly jumped up by 50 in numbers. I plan to continue that speed soon, but I needed to do something else first (test all boards I have, more information about that further down).
So the next 100 - 150 units should be finished soon - after that we'll most likely have a short break as we need more cases first. But more on that further down as well.
Figuring out all issues, finding workarounds, discussing possible fixes with the case company
This is probably the main reason why things have been so slow at the beginning. With each batch of units, we improved the assembly process, found new issues or better workarounds.
We read the posts by users who received their units and continued improving with each batch.
I can't remember when we fixed exactly what, but all in all, we probably needed around 1 hour of work time for each unit to make it work properly! Some worked right away, but some had to be disassembled and reassembled partly or fully multiple times until they were good enough to be shipped.
Now we're probably down to about 15 minutes per unit, which is a bit longer than it took for the Pandora after the process had been optimized, but as we still have some manual fixes to apply, that's pretty good.
In case you want to know what fixes we currently need to do (and whether these can be fixed in the future) read the spoiler
So, most of these issues will be fixed with the next case production run.
Right now, we're applying these fixes manually before assembly, which works very well and doesn't slow us down that much.
However, it caused quite a delay at the beginning... as we were assembling units, finding issues, had to disassemble them again, tried to find fixes, etc.
This was a pretty slow process. Now that we know what we need to do, it's a lot faster and pretty straightforward.
These fixes have already applied to most of the cases we still have here. However, as the coating company had issues at first as well (too much or little paint causing not-so-pretty looking cases), we only have around 350 cases in total we can assemble at the moment.
The next ones need to be produced first (which takes about a week), then transported to us (which takes about 2 - 3 weeks) and then they need to be coated (could be 1 week or longer, depending on how much work the company has at the moment).
So there could be a small gap after the first around 350 units have been assembled, but it shouldn't be too long.
What about the PCBs?
The first batch of PCBs we received was pretty good. We had a failure rate of about 5%, which is okay for a new production run.
However, we assembled these units first and then had to disassemble them again if a PCB failed, which needed a bit more time that it should.
So now I'm doing a quick test before we assemble them so we know they do boot at least.
This was especially necessary as we received a bad batch of mainboards! Out of 100 delivered, 44 didn't even react to power!
That's something that needs to be resolved! It's probably something simple, as there are not a lot of parts between the USB port and the charger chip. And as so many units are affected, it could be a bad batch of one part which would then need to be replaced on the boards.
However, it meant that I had to do a quick test with all mainboards I had here so I can send them to Nikolaus / Global Components for debugging right away.
That's the reason I didn't assemble and ship more Pyras during the last few days (whereas I was shipping 12 per day the days before).
Now that all boards have been tested, I can continue with the assembly and shipping of units.
Oh, speaking of PCBs, there's also a bit of manual work I need to do on the current PCBs (fixed with the next production run):
Remove a resistor from the CPU-Board
That resistor was a leftover when we planned to use the same BurrBrown ADC for audio which we used for the Pandora:
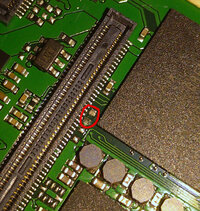
Unfortunately, there's is no way to connect the ADC to the OMAP5, so using that audio circuit was not possible. But there still was a resistor left - which caused the audio stream to react to noise in the unit. For example, starting the vibration always destroyed the audio stream. Removing that resistor fixes that, and at the moment, I need to do that manually.
Remove a resistor from the Mainboard
This is actually a small fix that was found by a community member: The emergency-shutoff temperature for the battery is configured using two resistor values. And it was set a bit too low, causing the battery to stop charging when the unit was being used AND the CPU-Board was still touching the battery case.
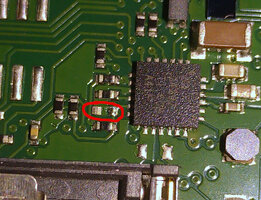
Removing the resistor changes the temperature value. Based on Nikolaus calculations, the emergency shutoff temperature is still low enough to not damage the battery, but now you can use the Pyra and charge at the same time - especially with the air gap between the CPU board and the battery.
The downside is that it now also has an emergency shutdown if the battery temperature is lower than about 10 - 12 °C. However, charging and using the CPU heats up the case anyways, so it should still charge with a lower outside temperature. So as long as you don't try to charge the Pyra in the fridge, everything is fine.
In the next production run, a different resistor value will be used which make it possible to charge at lower temperatures again as well. But at the moment, this is a pretty good workaround.
Future production run?
We have parts for around 520 units, which means that depending on the failure rate, we can assemble around 500 units before the next production run.
As you know, there's a global parts shortage right now - and we don't know what this will mean for the Pyras production, but that's the next thing I need to find out.
The OMAP5 probably won't be an issue, as it's not a mainstream part. For other parts, we can probably get replacements if need be.
I know the production will be at least 4.5% more expensive, which will cause me a bit more loss, but I still won't change the price you preordered it for, so don't worry about that.
There might be one change in the future: The manufacturer of our modem has released a pin-compatible version that works in any region. So no US / EU anymore! I'm currently testing it on a modified PCB to see how well it works, but it could be that the next production run will use that new modem. We'll see, nothing can be said for sure now.
I might also build a new case from scratch... but that's also in the future and we'll continue assembling Pyras while working on that, no worries
But you can be sure we'll continue improving the Pyra, so hopefully, it will be as good as I imagined it should be at some time
That was quite a lenghty post (took a few hours to write it up as well), but I hope you enjoyed it and now have a better insight of what happened.
As usual, in case you have any questions: Let me know!
This will probably be a longer post, so grab some tea or coffee and enjoy the read.
Why has assembly been so slow until now?
There various reasons why assembly has been so slow.
Too much work and too little time
One of them was that I had very little time: Due to Covid-19, my main employee who handles all the shipments in the shop was not in the office for more than two months. During that time, I had to handle all shipments myself - and so time was very limited.
During the little time I had left, I preassembled units and had to figure out what issues there are and how to prevent / improve them.
More on that later
That reason has been resolved now, luckily. My employee is back shipping, I was able to catch up with all tickets in the shop and my wife (who recently lost her job) is now preassembling units, which makes assembly a lot faster than before.
Last week I assembled 12 units within 2 hours each day, which is why we suddenly jumped up by 50 in numbers. I plan to continue that speed soon, but I needed to do something else first (test all boards I have, more information about that further down).
So the next 100 - 150 units should be finished soon - after that we'll most likely have a short break as we need more cases first. But more on that further down as well.
Figuring out all issues, finding workarounds, discussing possible fixes with the case company
This is probably the main reason why things have been so slow at the beginning. With each batch of units, we improved the assembly process, found new issues or better workarounds.
We read the posts by users who received their units and continued improving with each batch.
I can't remember when we fixed exactly what, but all in all, we probably needed around 1 hour of work time for each unit to make it work properly! Some worked right away, but some had to be disassembled and reassembled partly or fully multiple times until they were good enough to be shipped.
Now we're probably down to about 15 minutes per unit, which is a bit longer than it took for the Pandora after the process had been optimized, but as we still have some manual fixes to apply, that's pretty good.
In case you want to know what fixes we currently need to do (and whether these can be fixed in the future) read the spoiler
Fixes we need to apply to the case parts
Removing small pegs from the inner display frame
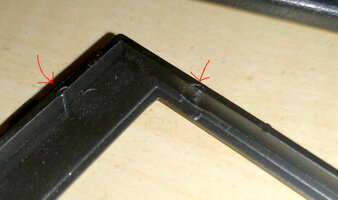
The previous designers added these pegs (I didn't even know about that), probably because they thought these will keep the LCD properly in place and otherwise it would move around (which it wouldn't - the Pandora also doesn't have the issue).
I've marked two of them in the picture above.
Unfortunately, these pegs cause an issue during assembly: As the frame is put on top of the LCD, these small pegs can easily CRACK the touchscreen as force is applied at that one point... even though the surroundings would fit.
To prevent that from happening, we need to manually cut all these pegs out with a knife, which takes about 45 seconds for each frame.
Fortunately, that was an easy fix in the mould, so the next batch of cases won't have these annoying little pegs anymore!
Cutting plastic from the battery compartment
If you received one of the first units, you probably have the issue that the battery compartment is very hard to open. We tried to fix the battery cover at first, but it turns out there's a way better fix for that. Cutting a bit of plastic from the battery compartment!
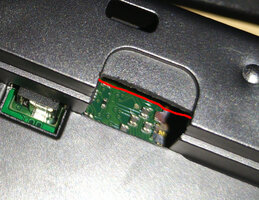
Originally, the plastic goes about as far as the red line - which leads to the issue that the clips are WAY too tight.
Removing a bit of plastic there makes the battery cover way more easy to open and close. However, removing too much will case the battery cover to not close properly anymore, so we need to cut, test, cut more, test again, and so on.
This needs about 1,5 minutes.
Luckily, that's also fixed in the moulds, so the next cases won't need that fix anymore!
Loosening the lower shoulder buttons a bit
The hole where the shoulder buttons are being put onto the peg is a bit too tight (interestingly enough, it was the same with the Pandora).
The difference is that the Pyra doesn't have full rings that go onto the peg but only half rings which you can easily bend open.
That's not a big thing and only takes about 10 seconds for both shoulder buttons - and that's also fixed in the mould, so a non-issue in the future.
Removing a bit of plastic below the DPad
Unfortunately, the hole for the DPad was off a bit - causing the DPad to collide a bit with the case when you push down.
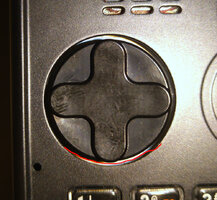
This doesn't take long (around 10 seconds per case part), but it's been fixed in the mould nevertheless, so also a non-issue in the future.
Cutting a bit from the keymat
We already knew about this before we produced the keymats, but the company didn't want to change the mould as it could cause some damage in that area - but I thought I mention that nevertheless:
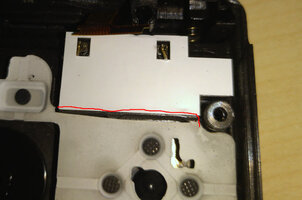
The keymat would collide with the case surrounding the speaker, causing DPad Up to feel stiffer than the other directions. It takes about 2 - 3 seconds to cut it, so I was fine doing that
Cutting away plastic leftovers from the production
There are various areas where there are plastic leftovers which we need to cut with a knife. This can probably be improved in the future by tweaking some machine data (heating, cooling, injection speed, etc.)
All in all, this takes around 30 - 45 seconds per case, just a guess.
Workarounds because we're missing a part of the mould
This is a pretty annoying issue. FormAction has created a special injection part for one mould to make the plastic between the battery and the PCB thinner. I even had to pay extra for that.
It seems they have NOT delivered that part to us, and we're currently trying to get that part! We've paid for it, it is ours, so they can't simply refuse to give it to us.
It's pretty obvious that such a part exists, if you compare earlier cases from FormAction and the newer ones:
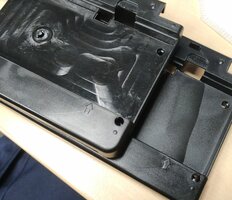
You don't need to be a genius to see that the surface is completely different! So yeah, something is clearly missing here.
Unfortunately, we cannot simply recreate that part and make the case thinner as well, as we're missing the 3D data of the case.
So there only two options: Either restart the full case of the Pyra from scratch - or get that part.
The thicker plastic causes the following issues:
Sanding down the pegs in the battery cover
So, to fix the gap, we're sanding down the peg in the battery compartment:
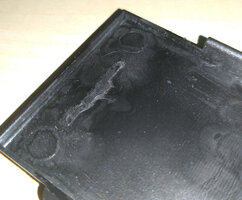
Originally, they had been added to push the battery down - but with the thicker plastic, that's too much. At the same time, we're pulling out the battery contacts a bit so they don't lose the contact that easily. Takes about 15 seconds per battery cover.
This fix has also been applied to the mould, so it's not needed in the future.
In case we get that part and are able to make the plastic thinner again, I'll use foam pads there instead of the plastic pegs. That's more flexible and does a better job.
Sanding down the area around the nubs
That's actually pretty annoying. To prevent the nubs getting stuck, we need to make the plastic area around the nubs thinner. That's a bit of manual work and takes about a minute per case:
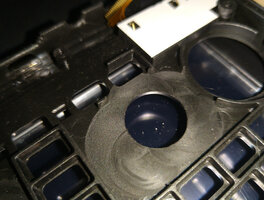
This is something we cannot change in the current moulds (removing plastic means adding steel in a mould...)
So this is something we'll always need to do unless we can get that missing part from the mould!
Adding small selfadhesive rubber pads at the edges of the CPU board
By doing this, we can recreate a small gap of air between the CPU board and the battery, causing the battery to stay a lot cooler!
This works without any bigger issue, as we sand down enough plastic for the moulds already.
Removing small pegs from the inner display frame

The previous designers added these pegs (I didn't even know about that), probably because they thought these will keep the LCD properly in place and otherwise it would move around (which it wouldn't - the Pandora also doesn't have the issue).
I've marked two of them in the picture above.
Unfortunately, these pegs cause an issue during assembly: As the frame is put on top of the LCD, these small pegs can easily CRACK the touchscreen as force is applied at that one point... even though the surroundings would fit.
To prevent that from happening, we need to manually cut all these pegs out with a knife, which takes about 45 seconds for each frame.
Fortunately, that was an easy fix in the mould, so the next batch of cases won't have these annoying little pegs anymore!
Cutting plastic from the battery compartment
If you received one of the first units, you probably have the issue that the battery compartment is very hard to open. We tried to fix the battery cover at first, but it turns out there's a way better fix for that. Cutting a bit of plastic from the battery compartment!

Originally, the plastic goes about as far as the red line - which leads to the issue that the clips are WAY too tight.
Removing a bit of plastic there makes the battery cover way more easy to open and close. However, removing too much will case the battery cover to not close properly anymore, so we need to cut, test, cut more, test again, and so on.
This needs about 1,5 minutes.
Luckily, that's also fixed in the moulds, so the next cases won't need that fix anymore!
Loosening the lower shoulder buttons a bit
The hole where the shoulder buttons are being put onto the peg is a bit too tight (interestingly enough, it was the same with the Pandora).
The difference is that the Pyra doesn't have full rings that go onto the peg but only half rings which you can easily bend open.
That's not a big thing and only takes about 10 seconds for both shoulder buttons - and that's also fixed in the mould, so a non-issue in the future.
Removing a bit of plastic below the DPad
Unfortunately, the hole for the DPad was off a bit - causing the DPad to collide a bit with the case when you push down.

This doesn't take long (around 10 seconds per case part), but it's been fixed in the mould nevertheless, so also a non-issue in the future.
Cutting a bit from the keymat
We already knew about this before we produced the keymats, but the company didn't want to change the mould as it could cause some damage in that area - but I thought I mention that nevertheless:

The keymat would collide with the case surrounding the speaker, causing DPad Up to feel stiffer than the other directions. It takes about 2 - 3 seconds to cut it, so I was fine doing that
Cutting away plastic leftovers from the production
There are various areas where there are plastic leftovers which we need to cut with a knife. This can probably be improved in the future by tweaking some machine data (heating, cooling, injection speed, etc.)
All in all, this takes around 30 - 45 seconds per case, just a guess.
Workarounds because we're missing a part of the mould
This is a pretty annoying issue. FormAction has created a special injection part for one mould to make the plastic between the battery and the PCB thinner. I even had to pay extra for that.
It seems they have NOT delivered that part to us, and we're currently trying to get that part! We've paid for it, it is ours, so they can't simply refuse to give it to us.
It's pretty obvious that such a part exists, if you compare earlier cases from FormAction and the newer ones:

You don't need to be a genius to see that the surface is completely different! So yeah, something is clearly missing here.
Unfortunately, we cannot simply recreate that part and make the case thinner as well, as we're missing the 3D data of the case.
So there only two options: Either restart the full case of the Pyra from scratch - or get that part.
The thicker plastic causes the following issues:
- Battery compartment does not close fully and has gaps at the side
- Nubs are being pushed against the case and get stuck
- No air gap between the CPU board and the battery compartment, causing the battery to heat up more than it needs to be
- Causing the battery to have worse contact
- It also causes the keyboard and gaming buttons to be a bit more mushy than they should be. It's nothing serious, but they could still be a bit better
Sanding down the pegs in the battery cover
So, to fix the gap, we're sanding down the peg in the battery compartment:

Originally, they had been added to push the battery down - but with the thicker plastic, that's too much. At the same time, we're pulling out the battery contacts a bit so they don't lose the contact that easily. Takes about 15 seconds per battery cover.
This fix has also been applied to the mould, so it's not needed in the future.
In case we get that part and are able to make the plastic thinner again, I'll use foam pads there instead of the plastic pegs. That's more flexible and does a better job.
Sanding down the area around the nubs
That's actually pretty annoying. To prevent the nubs getting stuck, we need to make the plastic area around the nubs thinner. That's a bit of manual work and takes about a minute per case:

This is something we cannot change in the current moulds (removing plastic means adding steel in a mould...)
So this is something we'll always need to do unless we can get that missing part from the mould!
Adding small selfadhesive rubber pads at the edges of the CPU board
By doing this, we can recreate a small gap of air between the CPU board and the battery, causing the battery to stay a lot cooler!
This works without any bigger issue, as we sand down enough plastic for the moulds already.
So, most of these issues will be fixed with the next case production run.
Right now, we're applying these fixes manually before assembly, which works very well and doesn't slow us down that much.
However, it caused quite a delay at the beginning... as we were assembling units, finding issues, had to disassemble them again, tried to find fixes, etc.
This was a pretty slow process. Now that we know what we need to do, it's a lot faster and pretty straightforward.
These fixes have already applied to most of the cases we still have here. However, as the coating company had issues at first as well (too much or little paint causing not-so-pretty looking cases), we only have around 350 cases in total we can assemble at the moment.
The next ones need to be produced first (which takes about a week), then transported to us (which takes about 2 - 3 weeks) and then they need to be coated (could be 1 week or longer, depending on how much work the company has at the moment).
So there could be a small gap after the first around 350 units have been assembled, but it shouldn't be too long.
What about the PCBs?
The first batch of PCBs we received was pretty good. We had a failure rate of about 5%, which is okay for a new production run.
However, we assembled these units first and then had to disassemble them again if a PCB failed, which needed a bit more time that it should.
So now I'm doing a quick test before we assemble them so we know they do boot at least.
This was especially necessary as we received a bad batch of mainboards! Out of 100 delivered, 44 didn't even react to power!
That's something that needs to be resolved! It's probably something simple, as there are not a lot of parts between the USB port and the charger chip. And as so many units are affected, it could be a bad batch of one part which would then need to be replaced on the boards.
However, it meant that I had to do a quick test with all mainboards I had here so I can send them to Nikolaus / Global Components for debugging right away.
That's the reason I didn't assemble and ship more Pyras during the last few days (whereas I was shipping 12 per day the days before).
Now that all boards have been tested, I can continue with the assembly and shipping of units.
Oh, speaking of PCBs, there's also a bit of manual work I need to do on the current PCBs (fixed with the next production run):
Remove a resistor from the CPU-Board
That resistor was a leftover when we planned to use the same BurrBrown ADC for audio which we used for the Pandora:

Unfortunately, there's is no way to connect the ADC to the OMAP5, so using that audio circuit was not possible. But there still was a resistor left - which caused the audio stream to react to noise in the unit. For example, starting the vibration always destroyed the audio stream. Removing that resistor fixes that, and at the moment, I need to do that manually.
Remove a resistor from the Mainboard
This is actually a small fix that was found by a community member: The emergency-shutoff temperature for the battery is configured using two resistor values. And it was set a bit too low, causing the battery to stop charging when the unit was being used AND the CPU-Board was still touching the battery case.

Removing the resistor changes the temperature value. Based on Nikolaus calculations, the emergency shutoff temperature is still low enough to not damage the battery, but now you can use the Pyra and charge at the same time - especially with the air gap between the CPU board and the battery.
The downside is that it now also has an emergency shutdown if the battery temperature is lower than about 10 - 12 °C. However, charging and using the CPU heats up the case anyways, so it should still charge with a lower outside temperature. So as long as you don't try to charge the Pyra in the fridge, everything is fine.
In the next production run, a different resistor value will be used which make it possible to charge at lower temperatures again as well. But at the moment, this is a pretty good workaround.
Future production run?
We have parts for around 520 units, which means that depending on the failure rate, we can assemble around 500 units before the next production run.
As you know, there's a global parts shortage right now - and we don't know what this will mean for the Pyras production, but that's the next thing I need to find out.
The OMAP5 probably won't be an issue, as it's not a mainstream part. For other parts, we can probably get replacements if need be.
I know the production will be at least 4.5% more expensive, which will cause me a bit more loss, but I still won't change the price you preordered it for, so don't worry about that.
There might be one change in the future: The manufacturer of our modem has released a pin-compatible version that works in any region. So no US / EU anymore! I'm currently testing it on a modified PCB to see how well it works, but it could be that the next production run will use that new modem. We'll see, nothing can be said for sure now.
I might also build a new case from scratch... but that's also in the future and we'll continue assembling Pyras while working on that, no worries
But you can be sure we'll continue improving the Pyra, so hopefully, it will be as good as I imagined it should be at some time
That was quite a lenghty post (took a few hours to write it up as well), but I hope you enjoyed it and now have a better insight of what happened.
As usual, in case you have any questions: Let me know!

