Share your projects


That's where you're going wrong, you're meant to upload porn of other peoples wives not your own.
Door SLAMS open. Are you winning son?... NOOOOOOOO!
 
Last edited:
Everyone was "build" out of flesh, and your Body eats up some parts (like the eat cells who take care that some cells dont grow to much ) so you cant be vegan anyway..
 
As the same stuff happens in Farm Animals as in us, I would assume they also have these cells that eat the stuff in the body ..
Cancer Cells are also our own Cells, but the mechanism that takes care that they can’t grow wild was damaged ..
 
Explain farm animals to me.

tnGAmLYc.jpg
 
Everyone was "build" out of flesh, and your Body eats up some parts (like the eat cells who take care that some cells dont grow to much ) so you cant be vegan anyway..
Proteins get recycled indeed. But this recycling does not cause suffering nor does it damage health or the environment. I am not actually vegan anyway, because I still consume stolen bee puke. But I am not buying it anymore. That is my project, stop stealing honey from bees. Stealing honey is much less bad than torturing animals in torture camps, but stealing honey is still pretty mean. Here is another project: finding an good alternative to put in my tea or becoming a real man by getting used to unsweetened tea.
 
Proteins get recycled indeed. But this recycling does not cause suffering nor does it damage health or the environment. I am not actually vegan anyway, because I still consume stolen bee puke. But I am not buying it anymore. That is my project, stop stealing honey from bees. Stealing honey is much less bad than torturing animals in torture camps, but stealing honey is still pretty mean. Here is another project: finding an good alternative to put in my tea or becoming a real man by getting used to unsweetened tea.
I just switched to water. I might add flavor to my warm water with herbs. If you really need sweetness in your drink maple syrup works, I used to use raw coconut blossom sugar.

Also, deviating from the topic about projects...
I'm working on more VR related work and trying to make steps to visit a big companies cleanroom (you never know it can't happen until you try).
 
Odd project I just did for my Car, a 2019 Subaru WRX. Last year I had the entire 6-speed Manual Transmission and Drivetrain swapped with the STi version ( not entirely cheap, but feel it was worth it), which gives it a Limit Slip Differential and more importantly a central Differential that can be adjusted to lock by user control or automatic modes,It can go from a near 70% Rear to 30% front split with various locking amounts to a full locking mode that sets the power distribution to 50% Rear and Front wheels for gravel or extreme snow etc...
It's pretty nice, but since I have a WRX and not an STi I was lacking the dash cluster displays that shows the Differential Locking amount and I was running an aftermarket Differential ( DCCD ) controller that sits under the Center console, so I didn't have access to the controls directly on the DCCD controller without opening the lid on the arm rest, so not entirely convenient. Since it wasn't entirely straight forward to adapt the more modern 2019 STi controls with my aftermarket setup, So I did a bit of an electronics project to adapt the older 2004-2007 STi controls which utilizes the holes where the heated seat switches are mounted and since Subaru doesn't change much of anything for 20+ years these control switches just slotted into where I would have heated seat switches if I wasn't cheap.

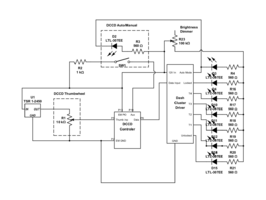
As for a display, I pretty much implemented what would have been in an older STi a series of Lights that show if the DIffs are locked, and the aggressiveness of the locking, if it's in an Auto Mode or manual. I designed a simple LED display based around a dash cluster driver that was provided with the aftermarket MapDCCD differential controller, 3D printed an enclosure with PETG plastic that can handle temperatures of a hot car in the Summer. The display bezel itself Is using a multi material 3D Print using a black opaque to make the shape of the symbols and a transparent material to allow the LED light to shine through. I covered it with some black tinting material to clean up the display and hide some of the printing marks.

My goal is to eventually get rid of this Simple LEDs with a more advanced oLED display with more information and better looks, this is version 1.0. I'll need to get a display and micro-controller and program it to do cool things, that will take time.

Just some additional information adapting the original 2004-2007 STi controls to the Aftermarket DCCD controller requires a 0-5V Signal on the Thumbwheel, which I only had a 12V source handy, so I used a a TSR 1-2450 5V Switching regulator, one of those cool drop-in replacements for the 7805 that is really efficient and doesn't require a heat-sink.

Some early testing:
20220617_165652.jpg

Functional Testing:

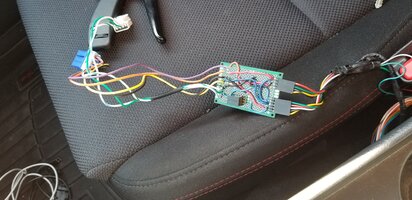
Quick circuitry layout I threw together:
Screenshot from 2022-07-06 21-51-52.png
"Prototype" circuit board that lazily became final board:
20220706_172915.jpg


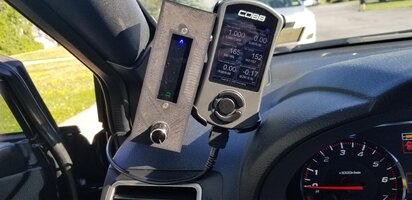
The 2004-2007 STi DCCD controls adapted in my 2019 WRX (direct fit):
20220706_172921.jpg

Picture of Version 1.0 Display (left)... Someday oLED with better functionality.
20220706_174608.jpg

It doing it's thing:
 
Last edited:
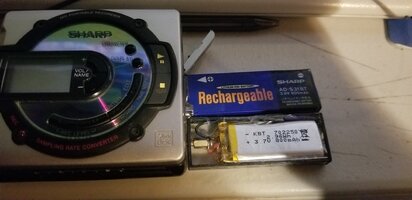
Well if your MiniDisc player's battery hasn't been Manufactured since 1999 you need to get a tad creative....

3d printed frame, from a design off thingiverse, had to narrow the sides of the walls to accommodate the battery I could source. Some copper foil to make the negative contact and an old computer motherboard standoff that makes the positive. And a little glue and tape..

The voltage is a little off but works well enough


.20220813_190010.jpg
 
Last edited:
SBYE1213small.jpg


1660485811571.jpeg

1660485860262.jpeg


i got 15 Dell battery packs. 90 18650 cells. turns out all 90 were good. BMS boards faulty. so i stripped them out of the case and built 3 sets of 3P10S battery packs . last photo is during spot welding the nickle strips. Firdt pic is two of the packs wrapped. the middle picture is of the plastic box im putting them in. the will be wired in series to give approx 12V 75Ah . the board with the 2 black heatsinks is a boost conveter. This is to get 19 V to drive a monitor. the smaller board is a 5V 5A power board. this is to run a rasp pi 4 in an argon one M.2 case Rpi4 has a 256GB nvme SSD. plus there is a battery voltage display and a solar charger and a 12V cigarette lighter socket. this is going into my Suzuki Vitara to power a fridge and a 12V oven. so i can leave them on when stopped at jobs but still keep my drinks cool and heat up lunch.. all without flattening the car battery.
 
An interesting observation: The laziness has a critical mass above which it decays to a few projects.

Some time ago I repaired an old audio set I got and I had no remote controller for it. I wanted to have a remote as after an operation with a jigsaw on speakers it started to have a nice sound.
Too lazy to search in Internet and all shops for it.
So I found which protocol is used and wrote a Perl script to find commands for every button in the original remote using image analysis and some evolutionary algorithm. Then I made the remote controller program for Arduino. Customized Arduino to run on lower voltage and not use energy when none of 32 buttons of matrix keyboard are pressed. Finally built the remote.
 
which probably took more effort than searching ebay for a remote.... My Topfield 7160 remote is constantly being dropped on the tiles by She who must be obeyed. im on my 4th ebay remote... last one was about $15 AUD delivered....
 
Interesting fact: Today I tried to find this remote or replacement. And... I can't find it! There are similar version clones, but for an earlier version of the stereo, without volume control motor, and none in my country.
And the fun was when I repaired the power amp. Some "genius" decided to use an amplifier design in which 2/3 of power output is inside a brick and filled with resin. Guess what was bad: The driving transistor INSIDE this resin. After sculpting and replacing (the replacement resin bricks are enormously expensive because this D-class buzzer is "audiophile" now) I found that it drifts when running, so I had to stuff the removed gap with thermal compound.
When the player was ready, I got speakers. Yes, also from throwaways. ?Universum? LS-BOX, whatever it is, whoever made it - no information about it at all. The problem: No bass and totally sealed design. Glued shut. I was thinking that there are only 2 speakers, for treble and bass, and the other 2 per channel are just holes for show - no, there are 4 speakers in every box and only the capacitors were bad. So I had to hack through the rear wall of the casing. Because generating sawdust into speakers was out of question, I had vacuum cleaner running to remove leftovers. Then I replaced capacitors, cleaned it, built a replacement sealing frame and made the rear wall again, this time using screws.
And this thing, fixed using various hacks and modifications invented when needed, has impressively nice sound.
 
Some time ago I repaired an old audio set I got and I had no remote controller for it. I wanted to have a remote as after an operation with a jigsaw on speakers it started to have a nice sound.
Too lazy to search in Internet and all shops for it.
So I found which protocol is used and wrote a Perl script to find commands for every button in the original remote using image analysis and some evolutionary algorithm. Then I made the remote controller program for Arduino. Customized Arduino to run on lower voltage and not use energy when none of 32 buttons of matrix keyboard are pressed. Finally built the remote.
Are you talking about an IR remote control here, or something more specialised., Because I've not found listings for remote control IR codes anywhwere, and the general solution outside of the power button is to put the end of the existing remote up toa learning remote and let it learn it that way. If you don't have a partially working remote I can't see an easy way to reverse engineer it. I assume it has a prefix then the keycode and presumably the prefix is set using pulldown resistors inside the unit, but I have no idea what the keycodes would be.
 
Are you talking about an IR remote control here, or something more specialised., Because I've not found listings for remote control IR codes anywhwere, and the general solution outside of the power button is to put the end of the existing remote up toa learning remote and let it learn it that way. If you don't have a partially working remote I can't see an easy way to reverse engineer it. I assume it has a prefix then the keycode and presumably the prefix is set using pulldown resistors inside the unit, but I have no idea what the keycodes would be.
Yes, it was about IR remote. And I had no remote to copy at all.
The protocol used by chip was Denon/Sharp. Generally there are two things sent with each keypress: ID of device I want to command and the command itself.
However, if you look for example in these codes, this is a similar remote, you will see that one remote can address multiple devices (this is visible best when binary representations are written in each line). It means that in fact there are 32*255=8160 possible bit alignments if someone wants to bruteforce it.
I decided to go with my tested way, I reverse-engineered a few proprietary VFD drivers with this trick (and bricked two of them). First, I assumed that the early 90s electronic is so robust that I won't fall into some service mode preventing me from using the machine. I put the webcam in front of the stereo and wrote a script to call v4l, take picture and dump LEDs state. The interface was Arduino with IRemote library.
The optimization I used is a bit "fuzzy" - the problem with typical evolutionary searching algorithms is that if you have population of e.g. 60, and testing of single solution takes a second, it takes a minute to test is it doing anything at all. In such poor cases, like find 32 good solutions of 8160, it usually does not, and even if something fires up, it starts after e.g. 1000 iterations and may "dissolve" in next operations - so not very effective. The hack is to even put some more effort to testing, but optimize towards obtaining significant parts of the bit stream. So the items must not point to the specific solution, like this bit stream lights this LED, but point towards specific change, like these bit streams correspond to reaction in these parts of the device. Then the leftover part is mangled (crossing, mutation, mutation-towards, etc.). So it tests population of let's say 50 bit alignments, but eliminates let's say 150 wrong ones. It will not give the ready solution, but will point towards the most important parts to test.
This way I got:
- Bit significances showing me only two prefixes
- About 35 comands. Some were doubled.
- The command to go two stations forward in the tuner. Not used in any remote for such device.
- Three commands to put equalizer in 2 predefinitions and turn it off, normally there is a single command which toggles these 3 states.
- The command to hang the microcontroller of CD player :). Seriously, I have no idea what is it doing. Tray-cycling unlocks it, so maybe it was the eject for players which had electonically-controlled tray?
I think the tool I used is not good there, and modern AI can do much better.
 
Back
Top