hmc
Active Member
Hi guys,
this hardware hack will be interesting for people, who want to use the Pandora in "laptop" mode. It will help keeping the screen opened in an angle of about 100° to 140° (or any other freely choosable angle).
Usually, the Pandora's screen lid rests in an angle of a little less than 180°.
For people wanting to use the Pandora in a laptop-like manner, this is not good.
Some Pandoras, especially the newer ones with the silver case, have hinges with enough friction, so that the screen stays in its position, even without the hinge resting. If you have such a Pandora, you probably won't need this hack.
If you want to work or play with an opening angle less than the resting angle, and you find the screen falling back or forth while you use the Pandora, this hack may be interesting for you.
This hack allows you to freely choose any resting angle. However, once you have chosen it, it won't be changeable anymore.
Note the drawbacks of this hack, though:
So, here are the step-by-step instructions:
What you need in addition to your Pandora is this:
For preparing yourself, make yourself familiar with:
Step 1:
Disassemble the Pandora's following the instructions from EvilDragon's video until 6:10.
Step 2:
Push the hinge capsule from inside the screen into the keyboard case part, so you can seperate the screen lid from the keyboard case. Be careful not to damage the screen cable when separating the two halves of the Pandora.
(see EvilDragon's video at 7:50)
Pushing out the hinge capsule was the only reason, why you needed to open the screen lid. You can now close it again, as shown in the video from 10:45 to 12:05
Step 3:
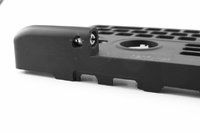
Now you need to make the hole of the keyboard case, that holds the hinge capsule, perfectly round, i.e. grind away the profile for the hinge capsule, so that the capsule can rotate freely inside that hole.
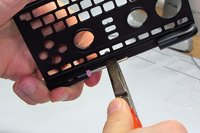
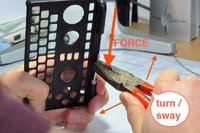
Use the 6mm grinder and the pliers, to manually grind the hole, as shown on the photos. Take care not to wiggle the grinding tool, but to just grind straight down into the hole by rotating the grinder inside the hole.
Afterwards, remove any grinding dust and burr carefully.
Step 4:
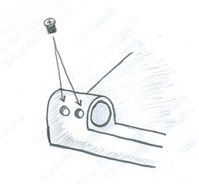
Mark the position on the back of the hinge hole as shown in the pictures:
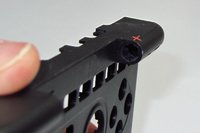
Step 5:
Use the electrocal grinder to drill a hole into the back of the case, where the marking is. The elliptical hole should have a horizontal diameter of about 3-4mm, not more than 4mm. Vertically it should have not more than 3mm.
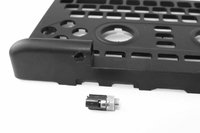
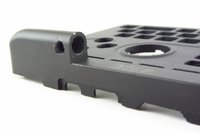
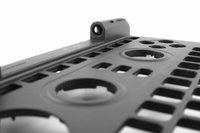
Step 6:
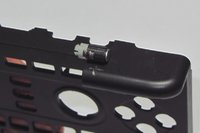
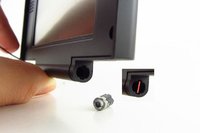
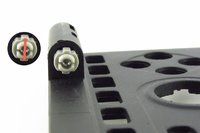
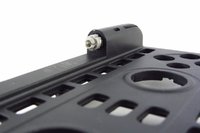
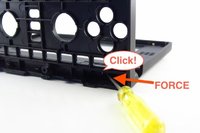
Insert the hinge capsule into the hole, but insert it in a way, that you can later easily "click" it into the screen lid's hinge tube. In order for that to work nicely, you should chose a good turning angle for the capsule to insert it, so that the capsule's profile fits the screen lid's profile when you later push the capsule back into the screen lid's hole.
The red lines on the photos help you to see what I mean with these cryptic words ;-)
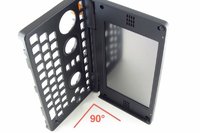
When aligned that way, you can later easily push back the capsule, if the screen lid is opened by about 90°.
Step 7:
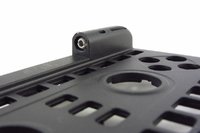
When inserted correctly, push the hinge capsule entirely into the keyboard case's hole.
Step 8:
Attach the screen lid to the keybaord case again, as shown in EvilDragon's video from 12:05 to 13:00
Step 9:
Push the hinge capsule back into the screen lid, as shown in EvilDragon's video from 13:00 to 13:16, but in a different way than shown in the video:
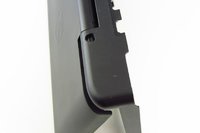
You have inserted the capsule in step 6 so, that it will be easily pushable into the screen lid, if the screen lid is opened by about 90°. So open it now by 90° and then push back the hinge capsule. Make sure it is pushed entirely down into the screen lid. The capsule should not be visible anymore, if you look into the keyboard case from the bottom. You should now be able to open and close the lid, and the hinge capsule should be visible through the drilled hole, rotating freely in its cylindrical hole.
Step 10:
You may already reassemble the entire remaining Pandora now, because the remainig work on the hinge can be done later.
(EvilDragon's video from 13:15)
FINISHED?
Maybe the hinge capsule has a good friction inside its cylindrical hole, so that no further steps are needed, to make the hinge stiff enough to hold the screen in its position. Now the hinge does not have any resting angle anymore (because the entire hinge capsule rotates in its hole), but if the friction is strong enough, you may even stop hardware-hacking here (or continue later, once the friction has decreased so much, that it becomes necessary to have a resting angle again. This may happen after some weeks, months or even years in this state of the hinge's modification).
If you want to "configure" a new resting angle, continue with the next steps now:
Step 11:
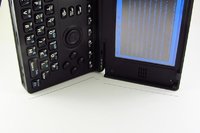
Choose a resting angle. I.e. use your Pandora as you like to use it in future, test different opening angles and choose the best one. Leave the Pandora opened with that optimal angle and put it on its right side. Choose the angle carefully, as you won't be able to change that later.
Put the Pandora with its right side onto a sheet of paper and draw along the edges of the case onto the paper, so that you have lines on the paper than later allow you to quickly restore that angle by putting the Pandora onto that sheet of paper and re-aligning the body and lid of the Pandora with those lines.
Step 12 (optional, risky for the hinge capsule, but recommended to improve the durability of the hack):
Dentists won't have any problem with this step. Non-dentists should be very careful now!
While the Pandora is opened in it's optimal angle you wish to configure,
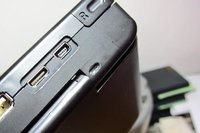
use the electrical grinder to damage the surface of the hinge capsule slightly. Grind a hole into the black covering plastic cylinder of the capsule *through* the drilled hole in the keyboard case.
This will later allow the epoxy glue to grip the capsule better (avoids slipping through of the hinge capsule, if the capsule wants to turn inside its hole).
Note that the covering plastic of the capsule is not very thick. You should avoid to grind the hold through the entire plastic layer.
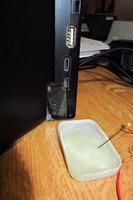
Step 12 (all this has to be done quickly, so make sure everything is well prepared!):
From now on, don't move *anything* anymore, until the glue has hardened.
Step 13:
Still don't move the lid, even if temptation is high! ;-)
Once the glue is hard (really hard, i.e. let it harden over night or so), remove the piece of scotch tape and inspect the hole. If it is not filled entirely with glue, especially if part of the capsule is still uncovered with glue, you should repeat inserting some glue and letting it get entirely hard, until the entire visible part of the capsule is covered and gripped by glue. Otherwise, your first screen lid movement might destroy what you have achieved so far.
Step 14:
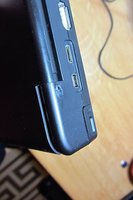
Once all the glue is really, really hard, you may carefully try to move the lid and test, if the new resting angle works fine.
Bad if it doesn't. Then you will have to repeat everything with a new pair of hinge capsule and keyboard case.
Have fun!
Daniel
This post has been promoted to an article
this hardware hack will be interesting for people, who want to use the Pandora in "laptop" mode. It will help keeping the screen opened in an angle of about 100° to 140° (or any other freely choosable angle).
Usually, the Pandora's screen lid rests in an angle of a little less than 180°.
For people wanting to use the Pandora in a laptop-like manner, this is not good.
Some Pandoras, especially the newer ones with the silver case, have hinges with enough friction, so that the screen stays in its position, even without the hinge resting. If you have such a Pandora, you probably won't need this hack.
If you want to work or play with an opening angle less than the resting angle, and you find the screen falling back or forth while you use the Pandora, this hack may be interesting for you.
This hack allows you to freely choose any resting angle. However, once you have chosen it, it won't be changeable anymore.
Note the drawbacks of this hack, though:
- The lid won't rest anymore in closed position. However, I have found this not to be a problem at all for me.
- You won't be able to disassemble / repair the hinge anymore after the modification. If something goes wrong, or the hinge breaks in future, you will have to replace the entire hinge / keyboard case combo, not just the hinge itself. Since the normal disassembly process cannot be done with the glued hinge, you may need to break other case parts on next disassembly, so you may also need to replace the screen lid case then.
- Of course (needless to say?) you will void your warranty with this hardware modification!
So, here are the step-by-step instructions:
What you need in addition to your Pandora is this:
- a screw driver
- epoxy 2-component glue
- pliers
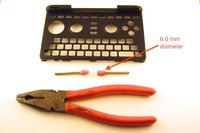
- a cylindrical or conical grinding tool with 6.0mm diameter:
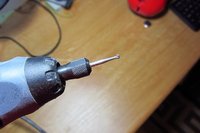
- an electrical grinder tool like this:
For preparing yourself, make yourself familiar with:
- EvilDragon's video showing disassembly and re-assembly of the Pandora. Actually it is about replacing the display cable, but it includes the entire process of dis- and re-assembly. Note that you only need to follow the instructions until 6:10 in the video, when he opened the screen lid. Don't remove the screen cable!
https://www.youtube.com/embed/l8GfjAsbmK8?feature=oembed
Step 1:
Disassemble the Pandora's following the instructions from EvilDragon's video until 6:10.
Step 2:
Push the hinge capsule from inside the screen into the keyboard case part, so you can seperate the screen lid from the keyboard case. Be careful not to damage the screen cable when separating the two halves of the Pandora.
(see EvilDragon's video at 7:50)
Pushing out the hinge capsule was the only reason, why you needed to open the screen lid. You can now close it again, as shown in the video from 10:45 to 12:05
Step 3:
Now you need to make the hole of the keyboard case, that holds the hinge capsule, perfectly round, i.e. grind away the profile for the hinge capsule, so that the capsule can rotate freely inside that hole.
Use the 6mm grinder and the pliers, to manually grind the hole, as shown on the photos. Take care not to wiggle the grinding tool, but to just grind straight down into the hole by rotating the grinder inside the hole.
Afterwards, remove any grinding dust and burr carefully.


Step 4:
Mark the position on the back of the hinge hole as shown in the pictures:
- horizontally: in the middle of the part of the hinge capsule, that's sticking in the keyboard case (black part of the capsule)
- vertically: where the hinge capsule hole is nearest to the case back


Step 5:
Use the electrocal grinder to drill a hole into the back of the case, where the marking is. The elliptical hole should have a horizontal diameter of about 3-4mm, not more than 4mm. Vertically it should have not more than 3mm.


Step 6:
Insert the hinge capsule into the hole, but insert it in a way, that you can later easily "click" it into the screen lid's hinge tube. In order for that to work nicely, you should chose a good turning angle for the capsule to insert it, so that the capsule's profile fits the screen lid's profile when you later push the capsule back into the screen lid's hole.
The red lines on the photos help you to see what I mean with these cryptic words ;-)
When aligned that way, you can later easily push back the capsule, if the screen lid is opened by about 90°.


Step 7:
When inserted correctly, push the hinge capsule entirely into the keyboard case's hole.


Step 8:
Attach the screen lid to the keybaord case again, as shown in EvilDragon's video from 12:05 to 13:00
Step 9:
Push the hinge capsule back into the screen lid, as shown in EvilDragon's video from 13:00 to 13:16, but in a different way than shown in the video:
You have inserted the capsule in step 6 so, that it will be easily pushable into the screen lid, if the screen lid is opened by about 90°. So open it now by 90° and then push back the hinge capsule. Make sure it is pushed entirely down into the screen lid. The capsule should not be visible anymore, if you look into the keyboard case from the bottom. You should now be able to open and close the lid, and the hinge capsule should be visible through the drilled hole, rotating freely in its cylindrical hole.


Step 10:
You may already reassemble the entire remaining Pandora now, because the remainig work on the hinge can be done later.
(EvilDragon's video from 13:15)
FINISHED?
Maybe the hinge capsule has a good friction inside its cylindrical hole, so that no further steps are needed, to make the hinge stiff enough to hold the screen in its position. Now the hinge does not have any resting angle anymore (because the entire hinge capsule rotates in its hole), but if the friction is strong enough, you may even stop hardware-hacking here (or continue later, once the friction has decreased so much, that it becomes necessary to have a resting angle again. This may happen after some weeks, months or even years in this state of the hinge's modification).
If you want to "configure" a new resting angle, continue with the next steps now:
Step 11:
Choose a resting angle. I.e. use your Pandora as you like to use it in future, test different opening angles and choose the best one. Leave the Pandora opened with that optimal angle and put it on its right side. Choose the angle carefully, as you won't be able to change that later.
Put the Pandora with its right side onto a sheet of paper and draw along the edges of the case onto the paper, so that you have lines on the paper than later allow you to quickly restore that angle by putting the Pandora onto that sheet of paper and re-aligning the body and lid of the Pandora with those lines.

Step 12 (optional, risky for the hinge capsule, but recommended to improve the durability of the hack):
Dentists won't have any problem with this step. Non-dentists should be very careful now!
While the Pandora is opened in it's optimal angle you wish to configure,
use the electrical grinder to damage the surface of the hinge capsule slightly. Grind a hole into the black covering plastic cylinder of the capsule *through* the drilled hole in the keyboard case.
This will later allow the epoxy glue to grip the capsule better (avoids slipping through of the hinge capsule, if the capsule wants to turn inside its hole).
Note that the covering plastic of the capsule is not very thick. You should avoid to grind the hold through the entire plastic layer.

Step 12 (all this has to be done quickly, so make sure everything is well prepared!):
- Prepare a small piece of scotch tape,
- prepare the epoxy glue,
- then quickly (before the glue becomes harder) hold the Pandora with the drilled hole facing upwards and apply drops of epoxy, e.g. with a needle, into the hole, until the hole is filled.
- now attach the piece of scotch tape, cover the hole with it and press the tape well onto the casing surrounding the hole. Don't leave tracks, through which the epoxy may flow in the next couple of minutes. This will later make for a nicely plain surface of the glue, too.
- You should work the hinge a bit, i.e. turn the lid a bit back and forth, in order to let the epoxy flow into more small gaps inside the hole, which will improve the grip of the glue. But make sure, that you end up with your optimal angle after working the hinge:
- Quickly put the Pandora on its right side again, onto the paper sheet prepared in step 11, and realign the angle with the lines on the sheet.
From now on, don't move *anything* anymore, until the glue has hardened.

Step 13:
Still don't move the lid, even if temptation is high! ;-)
Once the glue is hard (really hard, i.e. let it harden over night or so), remove the piece of scotch tape and inspect the hole. If it is not filled entirely with glue, especially if part of the capsule is still uncovered with glue, you should repeat inserting some glue and letting it get entirely hard, until the entire visible part of the capsule is covered and gripped by glue. Otherwise, your first screen lid movement might destroy what you have achieved so far.
Step 14:
Once all the glue is really, really hard, you may carefully try to move the lid and test, if the new resting angle works fine.
Bad if it doesn't. Then you will have to repeat everything with a new pair of hinge capsule and keyboard case.

Have fun!
Daniel
This post has been promoted to an article
Last edited by a moderator:


