yoshi41dragon
Active Member
This topic has already been discussed in several posts, but there is no summary with screenshots and explanations. I try to close this gap.
Problem
Depending on the configuration, the password to access the default keyring will be asked, when starting WLAN on the Pandora.
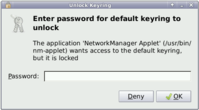
This can be annoying.
Option 1 (use keyring with auto login disabled)
The problem occurs when "auto login" is enabled. This is one of the questions when setting up the Pandora, but it can be changed in the "Startup Manager".
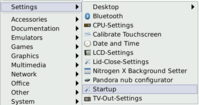
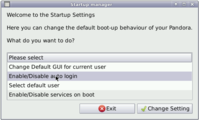
After "auto login" has been disabled, reboot the Pandora and you will be asked again for the default keyring password.
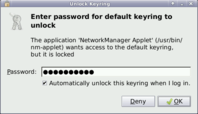
But, there is now an option to automatically unlock the keyring at login time.
With this option, the content of the default and login keyring is encrypted.
$HOME/.gnome2/keyrings/default.keyring
$HOME/.gnome2/keyrings/login.keyring
If these files are deleted, the default keyring password dialog appears again.
Note: The password does not have to be same as the users login password.
Option 2 (use unsafe keyring with auto login enabled)
If "auto login" is a requirement, it's still possible to avoid the password prompt. But be aware, the WLAN credentials are stored in clear text and readable by the default user.
In the choose password dialog, leave the password fields empty and press "Create". The next dialog is a safety warning, press "Use Unsafe Storage".
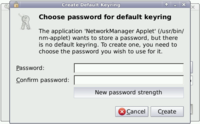
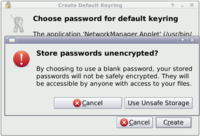
As already mentioned, the content of the default keyring is readable in clear text.
$HOME/.gnome2/keyrings/default.keyring
If you already set a password, but want to use this (unsafe) option, just delete the keyring files to start from scratch.
Option 3 (don't use keyring with auto login enabled)
This option is similar to option 2. "auto login" can be enabled, the WLAN credentials are stored in clear text, but only readable by user root.
The keyrings are not used and can be deleted (if not used for other purposes).
The trick is, to create the WLAN connection with user root and allow others to use it.
Start the network connection editor with root...
sudo /usr/bin/nm-connection-editor
Now create a new wireless connection and make sure, to check the option "Available to all users" (this option is deactivated for non-root users).
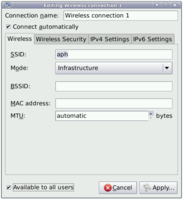
The network connection created by the default user, can now be deleted. Right mouse click on the network icon, to start the connection editor with the default user.
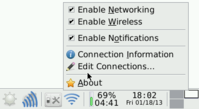
The WLAN credentials are still stored in clear text, but the file is only accessible by root.
/etc/NetworkManager/system-connections/Wireless connection 1
Note: The network connection created by root cannot be modified with the default user. To change it, start the network connection manager again with root.
I hope this helps other users. Feel free to comment or if you know other options, please let me know.
WLAN Control Script
I have WLAN and SSH turned off by default and use the network only for scripting (KiTTY on the PC). For this reason, I have my own WLAN control script.
It starts and stops the WLAN adapter plus SSH and displays the IP address...
I saved the script file as "/usr/bin/wlan". To start and stop, just issue the commands...
sudo wlan on or sudo wlan up
sudo wlan off or sudo wlan down
Might be useful for others as well.
Edit: Added up/down and suppress find/usage warnings.
Problem
Depending on the configuration, the password to access the default keyring will be asked, when starting WLAN on the Pandora.

This can be annoying.
Option 1 (use keyring with auto login disabled)
The problem occurs when "auto login" is enabled. This is one of the questions when setting up the Pandora, but it can be changed in the "Startup Manager".


After "auto login" has been disabled, reboot the Pandora and you will be asked again for the default keyring password.

But, there is now an option to automatically unlock the keyring at login time.
With this option, the content of the default and login keyring is encrypted.
$HOME/.gnome2/keyrings/default.keyring
$HOME/.gnome2/keyrings/login.keyring
If these files are deleted, the default keyring password dialog appears again.
Note: The password does not have to be same as the users login password.
Option 2 (use unsafe keyring with auto login enabled)
If "auto login" is a requirement, it's still possible to avoid the password prompt. But be aware, the WLAN credentials are stored in clear text and readable by the default user.
In the choose password dialog, leave the password fields empty and press "Create". The next dialog is a safety warning, press "Use Unsafe Storage".


As already mentioned, the content of the default keyring is readable in clear text.
$HOME/.gnome2/keyrings/default.keyring
If you already set a password, but want to use this (unsafe) option, just delete the keyring files to start from scratch.
Option 3 (don't use keyring with auto login enabled)
This option is similar to option 2. "auto login" can be enabled, the WLAN credentials are stored in clear text, but only readable by user root.
The keyrings are not used and can be deleted (if not used for other purposes).
The trick is, to create the WLAN connection with user root and allow others to use it.
Start the network connection editor with root...
sudo /usr/bin/nm-connection-editor
Now create a new wireless connection and make sure, to check the option "Available to all users" (this option is deactivated for non-root users).

The network connection created by the default user, can now be deleted. Right mouse click on the network icon, to start the connection editor with the default user.

The WLAN credentials are still stored in clear text, but the file is only accessible by root.
/etc/NetworkManager/system-connections/Wireless connection 1
Note: The network connection created by root cannot be modified with the default user. To change it, start the network connection manager again with root.
I hope this helps other users.
WLAN Control Script
I have WLAN and SSH turned off by default and use the network only for scripting (KiTTY on the PC). For this reason, I have my own WLAN control script.
It starts and stops the WLAN adapter plus SSH and displays the IP address...
#!/bin/bash
# enable/disable wlan adapter + ssh deamon
# check number of parameters
if [[ $# -ne 1 ]]; then
echo "Usage : $0 on|up | off|down"
exit 1
fi
# check for user root
if [ $(id -u) != "0" ]; then
echo "Error : Script must be started as user root, use \"sudo $0 on|up | off|down\"."
exit 1
fi
# enable/disable wlan + ssh
case $1 in
on|up)
# enable wlan adapter
/etc/init.d/wl1251-init start 2>&1 | egrep -iv "find usage:"
# wait for ip addr on wlan0 (max * 2 secs)
echo -en "\nWaiting for ip addr on wlan0."
typeset -i max=30
typeset -i i=0
while [[ $i -le $max ]]; do
i=$i+1
sleep 2
ifconfig wlan0 | grep "inet addr:" >/dev/null 2>&1
if [[ $? -eq 0 ]]; then
break
fi
echo -n "."
done
echo
# disable wlan power saving
iwconfig wlan0 power off
# start ssh deamon
/etc/init.d/dropbear start
# display ip addr
if [[ $i -le $max ]]; then
echo -e "\nWLAN IP ADDR : $(ifconfig wlan0 | grep 'inet addr:' | cut -d: -f2 | awk '{ print $1}')\n"
else
echo -e "\nWARNING : Could not get WLAN IP ADDR within specified timeout\n"
fi
;;
off|down)
# stop ssh deamon
/etc/init.d/dropbear stop
# disable wlan adapter
/etc/init.d/wl1251-init stop
;;
*)
echo "Usage : $0 on|up | off|down"
exit 1
;;
esac
# enable/disable wlan adapter + ssh deamon
# check number of parameters
if [[ $# -ne 1 ]]; then
echo "Usage : $0 on|up | off|down"
exit 1
fi
# check for user root
if [ $(id -u) != "0" ]; then
echo "Error : Script must be started as user root, use \"sudo $0 on|up | off|down\"."
exit 1
fi
# enable/disable wlan + ssh
case $1 in
on|up)
# enable wlan adapter
/etc/init.d/wl1251-init start 2>&1 | egrep -iv "find
# wait for ip addr on wlan0 (max * 2 secs)
echo -en "\nWaiting for ip addr on wlan0."
typeset -i max=30
typeset -i i=0
while [[ $i -le $max ]]; do
i=$i+1
sleep 2
ifconfig wlan0 | grep "inet addr:" >/dev/null 2>&1
if [[ $? -eq 0 ]]; then
break
fi
echo -n "."
done
echo
# disable wlan power saving
iwconfig wlan0 power off
# start ssh deamon
/etc/init.d/dropbear start
# display ip addr
if [[ $i -le $max ]]; then
echo -e "\nWLAN IP ADDR : $(ifconfig wlan0 | grep 'inet addr:' | cut -d: -f2 | awk '{ print $1}')\n"
else
echo -e "\nWARNING : Could not get WLAN IP ADDR within specified timeout\n"
fi
;;
off|down)
# stop ssh deamon
/etc/init.d/dropbear stop
# disable wlan adapter
/etc/init.d/wl1251-init stop
;;
*)
echo "Usage : $0 on|up | off|down"
exit 1
;;
esac
sudo wlan on or sudo wlan up
sudo wlan off or sudo wlan down
Might be useful for others as well.
Edit: Added up/down and suppress find/usage warnings.
Last edited by a moderator:

