Help needed L1/fn shoulder button not working


asimov-solensan

Very Active Member
Joined
Jan 8, 2010
Messages
732
I don't know what is the cause because a few things happened before I noticed.

First, yesterday afternoon my Pyra fell from bed. It was a minor hit but one of the shoulder buttons got stuck in the housing. I don't remember if it was L2 or R2 but it was one of the bigger ones.

Ok so I disassembled, put the button in place and booted the unit. Since it loaded the OS I just shut it down and forgot about it. The feedback of all shoulder buttons was fine but didn't tested the functionality.

Later that night I booted the unit and since I was in bed and it was dark I'm almost sure I enabled keyboard light using L1+brightness. I'm almost sure because that is the natural combination when thumb typing. If it failed at this point I think I would have noticed.

Then I tried installing anbox form apt and it upgraded several packages at the same time. After checking that anbox service does not work and confirming it requires the kernel to be compiled with a couple of additional modules I gave up. I tried to disable the keyboard light to watch a video and at this point is when I noticed the L1 wasn't working.

The FN function works with the right button but not with left FN/L1. Also if I run xev the keypress does not register any event.

Now I wonder if it is a phisical problem or caused by the upgraded packages. Any suggestions on what to check now?
 
If you run xev, and it's not registering the keypress, then it's either the contact (most likely) or the microswitch (plausible but improbable, those things last a while). You will have to resolder the contact. but before that, you will need to take out the battery, get a multitester and test every trace of the electric path. Soldering is not hard, but you will need one with a thin point or use a sucker (to suck out all excess tin, if you don't have one, put some toothpicks in water the night before).

I do not have pyra scematics at hand for you.
 
You will have to resolder the contact.
If that is even possible. The physically weakest point is the glue keeping the copper layer on the PCB, it is much more likely that a solder pad ripped off completely. If you're lucky you just need to bend the switch back, but if the feedback of the button feels the same that's probably not the case.
 
@asimov-solensan Open your Pyra and make some pictures from the top and the bottom, we'll look with you at the problem.
 
Is that clear that it is a physical problem? I will dissasmble this afternoon and check but expected to run a vanilla OS from an SD card to confirm it is not software related.

Can the Pyra run anbox? I did spend a few minutes trying to load the modules but it failed. Then I also gave up.

I wanted to try just for android games/emulators. But I don't think anbox will work for those. Therefor I also gave up at the first inconvenience.
 
Ok so I booted from an SD card and confirmed that it is hardware related. The button does not work in a fresh install. I'm f****d.

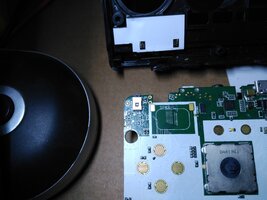
I took out the board and I don't know what to test on the switch. I can only access physically the four contacts that are connected to ground but nothing else. Check the image.

Is it possible to fix manually? I know chances are very low but I wish ED or someone with first hand information reads this.
 

Attachments

  • IMG_20220824_180834.jpg
    IMG_20220824_180834.jpg
    1,020.4 KB · Views: 118
I'm not familiar with that switch type. Have you checked that all of those lugs are connected together and at ground? Best to check that on a switch that works, assuming they're all the same. I wonder if that capacitor is involved in debouncing the switch or something? Might be a handy test point.


In the example, the button is on the topside, but it's the same principle

Remember to take out the battery and wait a little to let all electricity dissipate. Also wash your hands, or touch earth (a metal that is earthed) just in case you are with socks on a rug and are charged.


So Take your multimeter and put it on "one way current". Such that the multimeter goes to zero when you touch both needle points.
Now test both lower parts of the microswitch. It should go to zero. Do the same for both upper parts. It should go to zero.

If this is so, then that means that the resistance between them is zero and that it's the expected behaviour of the previous video and you can test a lower and a upper connector, while pressing (or not).

If you have a multitester with the ohm/resistance type, then that setting also works to see if current goes through it or not.
It's hard, because you need 3 hands: one to hold the needle on one of the upper connectors, another hand for the lower connectors, and a third hand to press the switch and see if it makes connection or not (you should then be able to read the difference between pressed and not pressed). Tip: Try to hold both needles in one hand, as if asian eating sticks or use plasticine to hold both in place or use an elastic, and something in between to adjust the distance between the needles.

If this is not readable at all, then I'm afraid the microswitch is dead. If it does work on one side, then the other side needs to be re-soldered. If it works on both sides, and the microswitch does not look loose... then it's not a hardware problem.
Also try jiggling the switch. If the connection stutters, then it has become unreliable (and replacement is needed).

And as Levi said: Use the other, working, microswitch to test the expected behaviour and then the faulty one, and see if there are differences.


ah, forgot: just press the switches and listen for differences. A working one clicks.

Here's something to help you on the way:


Code:
①━━┳━━②
    ◯
     ╱
    ◯
③━━┻━━④
 
Last edited:
Strange, i had a Dream this night that my mom let my Pyra fall on the carped and the Shoulderbuttons also brook ..
But my Pyra is still ok in real live so everything should be fine..

My Pandora got a incident some year ago where one Shoulderbutton Contact broke..
 
I'm currently wondering what those two test points are on the board below the switch. One seems connected the the trace that comes down the middle of the switch itself (though there's a trace that pops out of the right hand side goes briefly down then disappears over the other side via a covered via, and it's possible these are the same trace under the switch)
 
i had a Dream this night that my mom let my Pyra fall on the carped and the Shoulderbuttons also brook ..
You feel guilty that you love your Pyra more than for your mother. Your subconscious is testing you who you love more by let her break the Pyra.
 
@FBnil thanks for the video. I can guarantee you the switch is not a 4 pin switch. The visible solder points are for ground and physical attaching to the board. Checked with the multimeter just in case and confirmed 4 points are interconnected and it is the same with working switches also.

I cannot feel any noticeable difference in the sound or the feel of the button either.

The only way I can think right now to test the switch is to desolder that metal housing of the switch and see what it is beneath.

But I'm not going to do it unless I can get a replacement board in case I mess things. At least it is working and if I break it, who knows when will be replacement parts in dragonbox shop.
 
@asimov-solensan

Ok, before you start de-soldering things (which is maybe the next step, but not yet. Let's bring in the big guns first; the schematics:

Click on the following link, it will take you to EvilDragon's post, there is a zip file there:
In the zip, find the following PDF :
20161116-DragonFly-MAIN-Std-sch.pdf

Page 2 will show you that the shoulderbutton is a EVQ-PSD02K (which you can then DDG):

For example:

And it really, really, shows that the feet ARE the contacts (and there is nothing serviceable "inside", so don't open it or you'll break the EVQ-PSD02K):
Code:
①━━┳━━②
    ◯
     ╱
    ◯
③━━┻━━④

Where ① and ② are both marked as A and ③ and ④ as B and if you get a connection between A and B with a multitester then either:
The setting in the multitester is not good (you were in the milliampere or ohm/resistance, right?),
or the switch is broken and always making contact (but reading your post, the other shoulderbutton behaved exactly the same)
or the resistor between A and B stopped resisting (pun intended).

Please test again before drastically de-soldering.
Possibly testing from the above-side and inner-side (② and ④)


This is what is inside a EVQ-PSD02K:
source
 
Last edited:
There's no resistor (other than air) between A and B in an unactivated switch. I've also never come across a resistor, should there actually be one, failing short, diodes, capacitors, transistors yes, but resistors if they get toasty always fail open.
 
Ok I wanted to check the four point connection mechanism. And @FBnil was right. Is hard to see but the lateral of the switch is not metallic.

And as he says circuit closes between upper and lower contacts when pressing the switch.

It worked like this in all shoulder buttons. And when I tested the one failing, surprise, it fell out of place.

So, I grab the soldering iron and a beer and got it fixed in minutes. Thanks everyone for your ideas.
 
Back
Top