Drilling / Cutting into consoles


Fzero

Advanced Member
Joined
Mar 9, 2010
Messages
4,702
Just wondering who has done this, successfully, without smashing/splintering/destroying the shell?

Namely, a NES, though suspect they all much the same really, similar type of plastic and thickness.

I want to drill through a broken one in an attempt at making a little fun project, but don't want to ruin it by using the wrong drill bit or anything.

So anyone with experience cutting plastics, or who has drilled into a NES before even?

vcoleiro I'm looking at you, thinking you might have done so with your little mini cabs - though anyone who can help please.

I have only got cutters which are intended for cutting into wood, so guess I probably need to invest in one for plastics, but any tips welcome that might prevent the box splintering into little shards as soon as I put the drill to it...
I used a chicken knife heated to 1000 deg-F :D    Cut plastic like butter!
 
Be sensible, clamp it down, dont force it, and let the drillbit do its work.

A hole saw might also be what you are looking for, depending on size.

If you want just a small hole, a regular drillbit would work, then you can use a bigger one in the same hole to get slanted edges. Sand off the excess and you are done.
 
Haven't had much experience cutting plastic consoles, the micro consoles I have made , I just modded the logic boards . The mini arcade cases are made new out of wood.


In my current project which is going as well as a lead balloon , it involved cutting a PS3 controller in 2. I used a fine tooth saw and it managed to cut it very well. I also used a hot blade knife to cut through internal plastic bits I wanted to remove which works ok but creates slightly messy edges ie not good for clean cuts or cuts that will be visible.


As for drilling , I did manage to drill a new start button hole through the plastic without any issue. It turned out well. I used a spade/flat bit


Hailrazer might also be of more help, I believe he has modded cases before.
 
Last edited by a moderator:
Cheers guys, I think the spade/flat bit should work ok for me then.

Hopefully wont **** it it right up :)

I'll be sure to clamp it firmly though.

I did try drilling some holes into a piece of acrylic before, using a circle cutter drill bit, but it just caused long cracks coming outward ... I might not have had it clamped well enough [under my knee] or just not the ideal tool for the job.

I'll get a spade bit though and give it a go - Unless Hailrazer comes with any additional comments first. Sure he must do some amount of cutting into consoles to get those awesome portables he makes
 
You may want to try out a normal drill bit if you have one before shelling out on anything else. having said that, if you tried a circular cutter, then I imagine the hole you are trying to cut is larger than a drill bit would be.
 
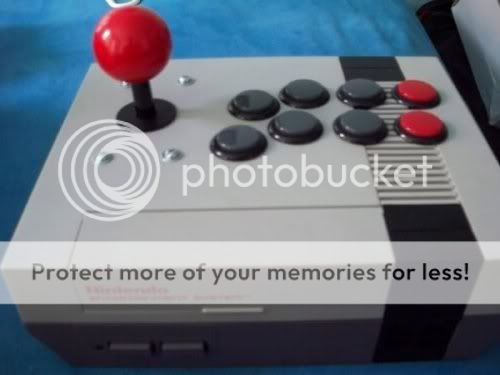
Yeah I'm planning to turn the old NES into an arcade stick.

As whoever-done-this-one-which-is-pretty-much-what-I'm-hoping-to-achieve has done:

1296528867881.jpg


I'm hoping to cram the gubbins inside though too, using a SFF PC or my old netbook.

Dreading the holes over that vent the most though, looks fragile.

If I mess it up, I mess it up, no matter. But would be great if I can do it right and get a nice new toy :)
 
I imagine old NESes are fairly easy to acquire at your local second-hand shop - not that I've looked.. :rolleyes:
 
Unfortunately not, the local charity shops never get consoles in, I do pop in fairly regularly to check on consoles/games/records.

We have CrackConvertors CashConvertors, CEX and those type shops here, which are more likely to get them in but they are not like the old local 2nd hand shop that puts stuff up on a good price. These guys are likely to charge you more than you'd pay if you got on ebay.

If I mash it up though, I'll look on ebay probably for a faulty unit to pick up on a cheap, one thats well yellow and has red light and no cables should be cheap enough eh :)

I'd have a couple of attempts at least before I gave up anyway
 
I've not drilled a console, but some other bits of plastic. It can help to clamp the work-piece closely against a block of wood behind, and drill into the wood. And start with a small hole then make it bigger.

I believe most of the charity shops aren't allowed to sell mains-powered electrical stuff.
 
Yes, what Helen says is right - clamp it against a block of wood you're happy to sacrifice, clamp as close to the hole as you can. And as for drill bits, I've never come across any plastic bits - but all my wood bits are wood/plastic, so you should be fine there. Metal and masonry drill bits are different, but wood and plastic are similar enough in terms of softness to use the same bits.


I'd be a little dubious about NES plastic after these years though - that sort of plastic becomes more brittle after years of UV exposure (daylight). With all holes, never drill the full-sized hole first though - start with a small hole to act as a pilot hole, to guide the next drill bit, then move up - probably through a few stages till you get to the full sized bit needed to guide your hole saw bit. However, don't cut the same size as your hole saw guide - I find it best to have a bit of material to drill against, so your last non-hole saw hole should be a couple mill smaller than the guide bit.


Going in stages you're cutting less material each time, your bit is less likely to wander and make a bigger hole than you wanted, and you'll see early if it's likely to splinter.


For cutting through the vent you might want to mark the circle first and then cut the plastic with a knife, but if not just clamp as close as you can along the vanes of the slots.


Having said all that, it really shouldn't be the biggest problem to cut a few holes. Just go for it, and best of luck!


Edit: Or basically everything HelenF said in her post already, if I'd read it properly first ;)
 
Last edited by a moderator:
Thanks guys, good tips definitely and the cutting in stages isn't something I had considered... Would've gone in with the 30mm hole so glad you pointed that out and I will do it progressively in stages. Also the cutting hole smaller than the next drill bit, hadn't even thought of that but makes sense.


Hopefully will start on this at the weekend
 
In France,  you can find working NES around 25€…

Not on ebay, cashconverters or similar websites/shops, though.

If you the seller is a nice guy, you can even find those at 15€ with a controller and cables.
 
Last edited by a moderator:
Just finished this up tonight :)

I did p**s up the hole over the grid/vent - As I'd feared I would.

Think I will get another NES shell at some point and try again, though thinking of heating up a piece of 30mm copper pipe with a blowtorch and melting cut the holes instead of drilling, which will hopefully create a cleaner hole.

Also when I get around to that, could do with shifting the 3rd button to the left some, pretty much sitting on top of the 4th one now but it's still ok to play with imo.

Still - It works and that's the main thing for me, and is a lot smaller form than my previous wooden box one.

Got a mini little PC inside there, with hyperspin FE and instant sheller to bypass all the Windows gumph on startup to give it a more console/arcade feel.

Just need to finish up configuring some of the emus still as was a new hard disc install on it.

Here she is

33kstbd.png
 
Good work.  I suppose with the broken bits , you could try gluing them back if you still have the bits that broke off.
 
Yeah I kept the snapped bits, will probably give a go at placing them back... probably glued to a thin sheet of plastic which I can then stick to the underside of the lid and hopefully mask some of the bodge job :)
 
Yep, you should cut away the whole line and replace it with something different,

cherrywood could be fine.
 
Last edited by a moderator:
Back
Top