A little button fix!


moxie

The voice of reason, sense and exasperation
Staff member
Joined
Aug 15, 2006
Messages
2,707
Age
51
Location
South of Sweden
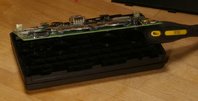
Ok, so I had a nonworking shoulder button which I fixed a week ago. This sunday, I thought I'd go for the slightly squishy B-button. Opening up as before, but this time I had to get to the keymat, which means lifting the actual circuit board. Looks like this:

open.jpg


Here, I've removed the keymat and also removed the B and X buttons. The circuit board is still attached by the WiFi antenna and the screen cable along the further edge.


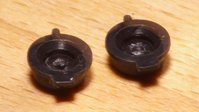
Anyways, compare squishy button B on the left with excellent button X on the right:

buttons.jpg


You can plainly see the casting remains on the left. On the right, there is a few weird reflexes, but essentially it is flat inside.


A few minutes of careful scraping with a knife inside the B button made it sufficiently flat. Reassembly (careful with that power switch!) and testing - Success! The B button is now as excellent as the other three. Yay!
 
Thanks for the photos - that makes it very clear what everyone's talking about. Looks like there's a job at the case factory to drill out the moulding mark with a drill press or similar, and in a few cases they've pulled up a few mill too short.


Also, lifting the board looks easier than I'd imagined - with the way the case opens at the level of the board (as it would, I suppose) you can use the volume knob to start to lift the board.


Thanks again for these instructions. Hopefully I won't need them when my Pandora arrives, but I'm sure they'll help out a few people.
 
Call me a masochist, but I had to open mine to check for these buttons. No squishiness at all, they feel alright, but you never know :blink:


So I opened it up, and it turned out they were fine, as expected, all flat inside.


Oh well.
 
Last edited by a moderator:
So there was absolutely nothing wrong but you opened it anyway. I wonder what would have happened if you broke something.


Also, tilting the board up like that can break off the microphone element since it sits inside a plastic sleeve mounted in the hinge hump. The board was designed to lift straight out after the antenna cable and LCD cable are removed.
 
I was careful. I already opened the case last week when I got my unit (refurbished one bought on eBay) to fix the shoulder button. I just wanted to go further and see how it is inside. Don't worry, I know I voided my warranty.


And yes, I saw the little microphone inside its plastic armor :)
 
Last edited by a moderator:
Thanks! But as much as I like Pandora Porn, it doesn't replace the real thing!
 
Ah, yes - My intention with that pictures was not "Look how easy it is" but rather "Look, this is a bit more involved than the shoulder buttons. I was careful to lift evenly along the edges (the tilt is possible only when it is already sufficiently raised so that the mic is free) and to constantly check that I didn't put too much stress on the screen cable.


If fixing the pad on a shoulder button is "A no-brainer if you know wich way to turn a screwdriver" then this is "For those with a certain experience in dis- and assembly". Definitely a bit trickier.
 
Thanks for documenting your fix Moxie. I just fixed my 'A' button by dremeling the extra plastic underneath. It was kind of a pain to get to the button, but it was well worth the trouble. Now it feels good like all the other buttons :D


It's amazing how small the tolerances are in these Pandoras. That tiny bit of plastic causing the mushiness...
 
Another squishy A button fixed.


I had to use a dremel to ream out the center bump.
 
Back
Top